検証用の仮想マシンを動かすKVMホスト環境で、仮想マシンの状態確認と電源オンのためにvirt-managerを開いたりvirshコマンドを叩いたりするのが面倒くさかった。
Webブラウザでアクセスできれば楽だと思い、WebからGUIで管理できるソフトウェアを試したものの、しっくり来るものがなかったのでPHPで作ってしまうことにした。
Webから入力された裏でvirshコマンドを叩くような仕組みではお行儀が悪いので、libvirt-phpというPHPモジュールでPHPから直接KVMへ接続できるようにもする。
KVMホスト上にNginx+php-fpmを構築してPHPのWeb実行環境を構築。
サンプルのスクリプトはアクセス制限がないので、インターネットなど公開しているサーバの場合は不正にアクセスされないよう対策が必要。
確認環境
Ubuntu 18.04
インストール
KVM環境は既に構築されているものとする。
sudo apt install nginx \
php-fpm \
php-libvirt-php
設定
Nginxの設定
sudo vi /etc/nginx/sites-available/default
---
#indexに「index.php」を追加
        index index.html index.htm index.php index.nginx-debian.html;
---
#ソケットのパスを指定してphp実行環境を構築(例)
        location ~ \.php$ {
                include snippets/fastcgi-php.conf;
                fastcgi_pass unix:/var/run/php/php7.2-fpm.sock;
        }
---
Nginxを再起動
sudo systemctl restart nginx.service
php-fpmのユーザをlibvirtのグループへ追加
これをしないと権限が足りなくてqemuへ接続できなくてエラーとなる。
php-fpmのユーザ名を確認
以下なら「www-data」が対象のユーザ
$ grep "user =" /etc/php/7.2/fpm/pool.d/www.conf
user = www-data
グループへ追加
sudo adduser www-data libvirt
php-fpmを再起動
sudo systemctl restart php7.2-fpm.service
スクリプトの設置
公式?の「libvirt.php」で簡単に利用できるクラスが提供されてるのでそれを使う。
sudo mkdir /var/www/html/virt
cd /var/www/html/virt
sudo wget https://raw.githubusercontent.com/libvirt/libvirt-php/master/examples/libvirt.php
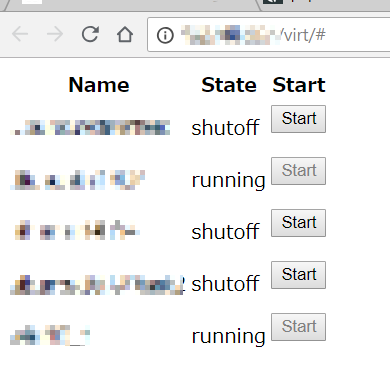
/var/www/html/virt/index.phpとして以下を保存
(仮想マシンの一覧を表示し、ボタンで起動する管理メニュー)
<?php
    require('libvirt.php');
    $lv = new Libvirt();
    if ($lv->connect("qemu:///system") == false)
        die('<html><body>Cannot open connection to hypervisor</body></html>');

    $uuid = (string)filter_input(INPUT_POST, 'dom_start');
    if ( $uuid !== '' ){
        $domName = $lv->domain_get_name_by_uuid($uuid);
        $ret = $lv->domain_start($domName) ? "<p>[ " . $domName . " ] has been started successfully</p>" : '<p>Error while starting domain: '.$lv->get_last_error().'</p>';
    }

    $doms = $lv->get_domains();
?>
<html>
<head>
<meta charset="UTF-8">
<title>PHP Virt Start</title>
</head>
<body>
<?php if(isset($ret)) echo $ret; ?>
<table>
    <tr>
        <th>Name</th>
        <th>State</th>
        <th>Start</th>
    </tr>
<?php foreach ($doms as $name) :
    $dom = $lv->get_domain_object($name);
    $uuid = libvirt_domain_get_uuid_string($dom);
    $info = $lv->domain_get_info($dom);
    $state = $lv->domain_state_translate($info['state']);
    $disable = $lv->domain_is_running($name) ? ' disabled' : '';
?>
    <tr>
        <td><?php echo $name; ?></td>
        <td><?php echo $state; ?></td>
        <td>
            <form method="POST" action="#">
                <input type="hidden" name="dom_start" value="<?php echo $uuid; ?>">
                <button type="submit"<?php echo $disable; ?>>Start</button>
            </form>
        </td>
    </tr>
<?php endforeach; ?>
</table>
</body>
</html>
一応ownerをNginx/PHPのユーザに変更。
sudo chown -R www-data:www-data /var/www/html/virt
アクセス
「http://(サーバのIPアドレス)/virt/」でアクセスする。
libvirt-phpの使い方の参考
ソースと一緒に公開されてるサンプルぐらいしか参考にできるものが見つからなかった。
https://github.com/libvirt/libvirt-php/tree/master/examples


コメント
この記事を参考に、Centos 7.7.1908でやってみました。ありがとうございました。
# yum install httpd php php-mbstring
yumで入れれば特に設定は不要なはず。
phpinfo()などでphpが動作していることを確認。
# yum install php-libvirt
# usermod -aG libvirt apache
httpdのユーザapacheをlibvirtのグループへ追加
systemctl restart httpd
一応、Apache再起動(しなくてもいい模様)
phpinfoのモジュール一覧にlibvirtが表示される。